Making Molds and Castings
Many of you have asked about making your own nose cone castings. I thought
I'd document just how I go about the process. I use a silicone RTV
mold mix and a polyurethane casting resin mix.

First, I get a length of body tube a bit larger than the nose cone. I
cut it about 1" longer than the total length of the nose cone. I read
somewhere that for silicone RTV, a sulfur-free
clay should be used. I found some at my local Michael's craft store.
I roll out some of the clay until it's a little more than 1/2" thick. Then
I stick the nose cone into the clay. I put it in deep enough so it won't
come out when it get RTV poured over it. There's nothing like having the
nose cone popping up like a bobber after the RTV has been mixed and poured.
I carefully place the body tube over the nose cone and push it into the clay
until it bottoms out against the base.

 The
RTV I use calls for equal parts, by volume, of parts A (pink) and B (blue).
I estimate the amount of RTV I'll need and then put magic marker lines
at the same level on both cups. I pour parts A and B up to the lines.
Since Part B is much easier to pour than Part A, I pour Part B into Part
A. I then stir them together for at least 3 minutes. The RTV
doesn't start setting up for about 30 minutes, so you have lots of time
to thoroughly mix them together. Once they're mixed, I pour the
RTV into the body tube. I usually let the RTV cure overnight.
The
RTV I use calls for equal parts, by volume, of parts A (pink) and B (blue).
I estimate the amount of RTV I'll need and then put magic marker lines
at the same level on both cups. I pour parts A and B up to the lines.
Since Part B is much easier to pour than Part A, I pour Part B into Part
A. I then stir them together for at least 3 minutes. The RTV
doesn't start setting up for about 30 minutes, so you have lots of time
to thoroughly mix them together. Once they're mixed, I pour the
RTV into the body tube. I usually let the RTV cure overnight.
 I
remove all of the clay from the bottom of the body tube. At this point, I
can see just enough of the bottom of the nose cone to see the mold line or see
where the shock cord mount is located. I make a mark on the outside of the
body tube in line with one of these. I get a length of plastic tube that
I'll use to create my "pour hole". First, I use the tube to make a hole in
the clay. This hole will be filled with RTV and will make my plug.
I use clay to attach the tube to the base of the nose cone. Next, I mix a
small quantity of RTV Parts A and B, this time using
I
remove all of the clay from the bottom of the body tube. At this point, I
can see just enough of the bottom of the nose cone to see the mold line or see
where the shock cord mount is located. I make a mark on the outside of the
body tube in line with one of these. I get a length of plastic tube that
I'll use to create my "pour hole". First, I use the tube to make a hole in
the clay. This hole will be filled with RTV and will make my plug.
I use clay to attach the tube to the base of the nose cone. Next, I mix a
small quantity of RTV Parts A and B, this time using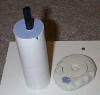 smaller plastic containers.
After mixing, I pour the RTV into the hole in the clay and into the top of the
nose cone. After the RTV has cured, I
remove the new plug from the clay. I use the mark I made on the body
tube to draw a line down the length of the body tube. Using a sharp blade,
I cut through the body tube and carefully peel it away from the RTV. I
then carefully continue to cut the RTV along the length of the nose cone, trying
to follow the nose cone's mold line. I then carefully spread the mold apart
along the cut and remove the original nose cone.
smaller plastic containers.
After mixing, I pour the RTV into the hole in the clay and into the top of the
nose cone. After the RTV has cured, I
remove the new plug from the clay. I use the mark I made on the body
tube to draw a line down the length of the body tube. Using a sharp blade,
I cut through the body tube and carefully peel it away from the RTV. I
then carefully continue to cut the RTV along the length of the nose cone, trying
to follow the nose cone's mold line. I then carefully spread the mold apart
along the cut and remove the original nose cone.
I close the RTV mold - taking care to align the edges as closely as possible.
The body tube is then slipped back over the mold and rubber bands are added.
The body tube helps keep the mold rigid during the casting process. The
mold is now ready to make it's first casting.

The polyurethane resin casting material I use calls for equal parts,
by volume, of parts A (slightly yellowish) and B (clear). I use
small clear plastic shot glasses with magic marker lines on them.
How much resin is required is a "trial and error" process.
Sometimes I use too little and I get casting walls that are too thin.
Sometimes I use too much resin and the nose cone feels too heavy.
Because the resin begins to cure very quickly, the next steps must be
done in about 2 minutes. I pour both parts A and B into a third
container and stir it for about 30 seconds. I have to thoroughly
mix the two parts, or the casting will have some uncured areas and be
junk.
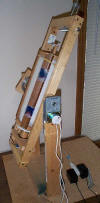 As soon as I finish mixing the parts, I pour the resin into the mold and
insert the plug. The mold is then wrapped inside some packing material. Next, I insert the mold into one of the ugliest machines
you may have ever seen. This machine has two small electric motors. One
motor rotates a small cage containing the mold. The second motor turns the
entire assembly so that the mold is also tumbling while it is rotating.
The goal is to make sure that the cavity inside the mold to being uniformly
coated with the resin. After 10 minutes of turning, I remove the mold from
the machine. The mold is set aside to continue curing for at least another
20 minutes. I can then remove the new casting from the mold and view my
finished product.
As soon as I finish mixing the parts, I pour the resin into the mold and
insert the plug. The mold is then wrapped inside some packing material. Next, I insert the mold into one of the ugliest machines
you may have ever seen. This machine has two small electric motors. One
motor rotates a small cage containing the mold. The second motor turns the
entire assembly so that the mold is also tumbling while it is rotating.
The goal is to make sure that the cavity inside the mold to being uniformly
coated with the resin. After 10 minutes of turning, I remove the mold from
the machine. The mold is set aside to continue curing for at least another
20 minutes. I can then remove the new casting from the mold and view my
finished product.
Created: May 22, 2005


